Liquifire #621, Part II, Take III

This is where you can post the story & photos of your John Deere Snowmobile project.
Post Reply
User avatar
JoeRainville
Posts: 4355
Joined: Tue Aug 02, 2005 12:00 am
Real Name: "John Deere Joe"
Location: Fort Worth, Texas
Contact:

Re: Liquifire #621, Part II, Take III

Post by JoeRainville »

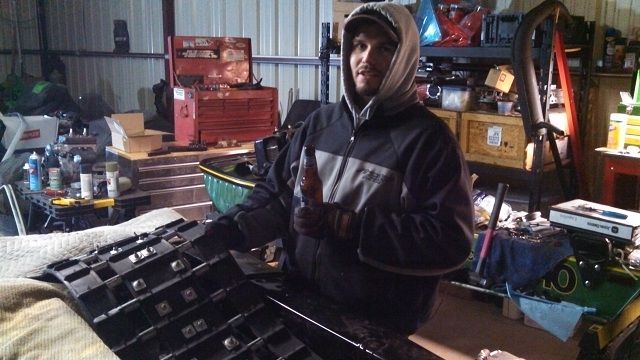
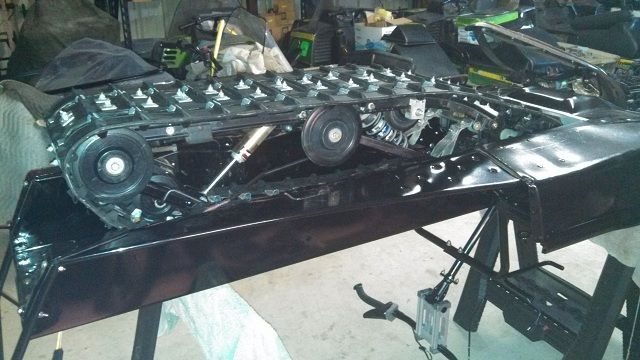
Tim installed a Boston Lager while I wrestled the skid into place:

Image

After getting the bolts in place, we put the ski's back on:
Image

Then we flipped her onto the floor, and put the rolling chassis on a regular sled lift instead of saw horses.
Honorary Tech Editor

Chuck Norris doesn't get frost bite. He bites the frost.
User avatar
JoeRainville
Posts: 4355
Joined: Tue Aug 02, 2005 12:00 am
Real Name: "John Deere Joe"
Location: Fort Worth, Texas
Contact:

Re: Liquifire #621, Part II, Take III

Post by JoeRainville »

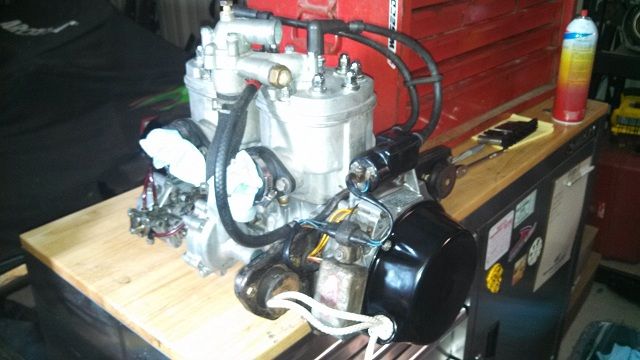
I was going to tear down the motor and at least put a fresh top end on it. Then Tim reminded me of a few things, such as it only has about 250 miles on it, and it's November. So I removed the recoil Wade Bennet loaned me at the race last year, and installed my rebuilt one. After removing the bent exchaust manifold, I cleaned and inspected the motor. It looked like new peering in from the exhaust ports, so I took Tim's advice; "Its just broke in, run it":

Image

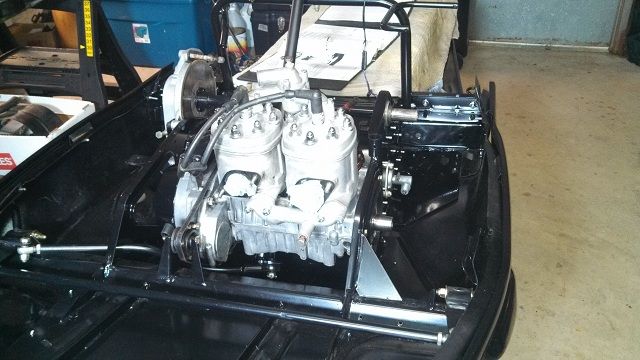
After doing a bolt check, I dropped it in the chassis last night:

Image
Last edited by JoeRainville on Wed Dec 04, 2013 4:07 pm, edited 4 times in total.
Honorary Tech Editor

Chuck Norris doesn't get frost bite. He bites the frost.
User avatar
JoeRainville
Posts: 4355
Joined: Tue Aug 02, 2005 12:00 am
Real Name: "John Deere Joe"
Location: Fort Worth, Texas
Contact:

Re: Liquifire #621, Part II, Take III

Post by JoeRainville »

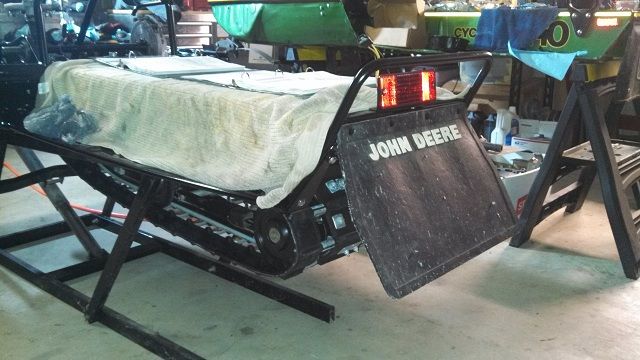
Last thing for the weekend was riviting on the snowflap:

Image

Not sure why this is a big deal, but it seems nice to have installed a finishing detail. Next up is the wiring, fuel system, exhaust, clutching, etc...

-JDJR :sled: :sled: :sled:
Honorary Tech Editor

Chuck Norris doesn't get frost bite. He bites the frost.
chriszildjian17
Posts: 152
Joined: Tue Jan 01, 2013 11:37 pm
Real Name: Chris Farrell
Location: greenville,mi

Re: Liquifire #621, Part II, Take III

Post by chriszildjian17 »

looking sweet joe. Hard to believe that bumper came out that nice. I have a terrible time trying to straighten them out.
79 spitfire. 78 cyclone 440
76 liqufire 340. 80 liquifire
76 liquifire 440 x 2
User avatar
skoalmint
Posts: 759
Joined: Fri Aug 06, 2010 11:33 pm
Location: Circleville Oh

Re: Liquifire #621, Part II, Take III

Post by skoalmint »

Looks Great Joe. Brock
ICCSF 108
Posts: 4369
Joined: Sun Jul 17, 2005 12:00 am
Real Name: Kenny Heins, AKA Grumpy
Location: Blue Springs Mo.
Contact:

Re: Liquifire #621, Part II, Take III

Post by ICCSF 108 »

After enormous testing back in the day we found out that un-powder coated slide rails were 2.65 MPH faster when road running. Don't forget to tighten the front skid springs all the way tight, this will help in the ruff IF the engine is strong enough to pull the skis?? Also remember those green squiggly vertical lines are worth another 3.2 MPH if installed properly on the hood.. At least that is what Tucker tells me?

Grumpy
AKA: Kenny, Grumpy, Mr. Richard Head
"I Hunt For it, Purchase it, Haul it, Sometimes Repair it, Sometimes Break it, Then Fix it Again, Label it, Warehouse it, Talk About it, So NOW, HOW Can I Take Any Less $$ For It?"
"God I love the smell of KLOTZ in the morning, That smell, you know that Gasoline/Oil Smell, MAKES the whole place SMELL like.. LIKE VICTORY. You know someday the 2 strokers are gonna end..."
Do Anti-War Protesters have reunions? If so what do they TALK about?
JDT
Posts: 5561
Joined: Wed Nov 21, 2007 1:00 am
Real Name: Todd
Location: Milbank South Dakota

Re: Liquifire #621, Part II, Take III

Post by JDT »

Keep up the fantastic work there Joe. Looks real fine. :thinksnow:
Todd Schrupp

Milbank SD
User avatar
427cobra
Posts: 2474
Joined: Thu Jan 26, 2006 1:00 am
Real Name: Eric
Location: Metamora IL

Re: Liquifire #621, Part II, Take III

Post by 427cobra »

Looks real nice! Has me wanting to put mine together! :beers;
Eric A.

"Life is tough, but it's tougher when you're stupid" - John Wayne
User avatar
JoeRainville
Posts: 4355
Joined: Tue Aug 02, 2005 12:00 am
Real Name: "John Deere Joe"
Location: Fort Worth, Texas
Contact:

Re: Liquifire #621, Part II, Take III

Post by JoeRainville »

Thanks for the support and nice words guys. I hope to make you proud at this years race, or at least crash and burn in a spectacular fashion.

Grumpy, you better check your meds, LOL!

-JDJR :trackdown:
Honorary Tech Editor

Chuck Norris doesn't get frost bite. He bites the frost.
JDT
Posts: 5561
Joined: Wed Nov 21, 2007 1:00 am
Real Name: Todd
Location: Milbank South Dakota

Re: Liquifire #621, Part II, Take III

Post by JDT »

Moving the fuel tank up front may make that happen..... :whistle: :whistle: :popcorn:
Todd Schrupp

Milbank SD
jimmy245
Posts: 28
Joined: Sat May 08, 2010 12:04 pm
Real Name: Jim Erlandson
Location: Minneapolis Area

Re: Liquifire #621, Part II, Take III

Post by jimmy245 »

Joe:

I am a complete newbie to this restoration game. I look at how you are restoring your sled and it makes me feel like I am using the Caveman technique to restore my 80 Liquifire!! I have the thing totally apart and have been sandblasting indiviual components and then using either Rustoleum "Professional" spray cans from hardware store (a silver can that only comes in gloss or flat black) or Duplicolor engine enamel. I like the Duplicolor since it comes in various shades of black - gloss, semi-gloss, and low gloss. Easier to match to original colors especially components under hood which are not gloss black. I have done the suspension in gloss black with the Rustoleum.

For the tunnel and front end, I plan to have them powder coated (but know very little about powder coating).

You have separated your tunnel from the front end of the body and had each powder coated separately. The tunnel section is a gloss black. However the front end is more of a satin or low gloss black. Here are my questions:

1. What color powder coating did you use for the tunnel section?
2. What color powder coating did you use for the front end?
3. What color powder coating did you use for the bumper?
4. What is the cost of having the above all powder coated?


Since I would rather not separate my tunnel from the front end, I am assuming that whoever I have do the powder coating can do the tunnel section in the glossy color and then the front end in the semi or low gloss and then throw the whole thing in the oven. Does that make sense?

As it looks like you have done quite a few restorations, I would assume you have used spray can paint on some of those restorations.

5. Any spray can paint brands that you think are superior to others that you would recommend? [I know preparation is 80% of the paint job and I am going all out on preping my components prior to painting.]

6. Cannot figure out why you would take that beautiful restoration and take the chance of smashing it up in a race?

7. Why in the world do you live in Texas?????

Best,

Jim - Long Lake, MN
Bought brand new '80 Liquifire in '79. Sold when I moved to Alaska in '81.
Now restoring '80 Liquifire from bottom up.
User avatar
JoeRainville
Posts: 4355
Joined: Tue Aug 02, 2005 12:00 am
Real Name: "John Deere Joe"
Location: Fort Worth, Texas
Contact:

Re: Liquifire #621, Part II, Take III

Post by JoeRainville »

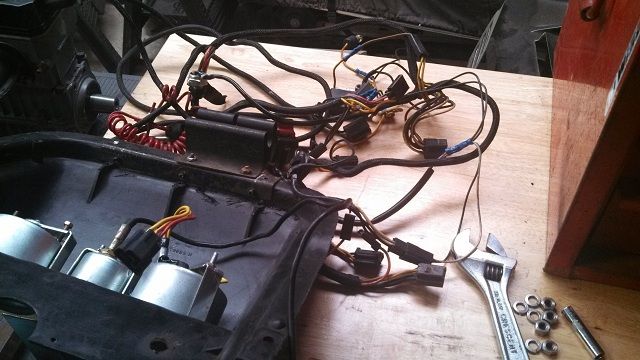
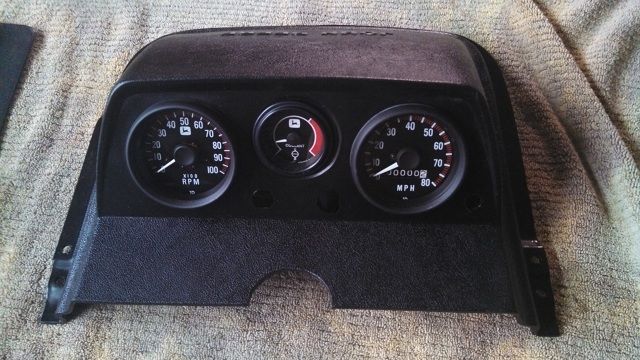
The Thanksgiving holiday allowed me some more QGT to work on the 621 Liquifire. Next up was straightening out the wiring, finding out why the lights died on the RWC and swaping the gauges over to the updated dash. First up was removing the harness and gauges from the old 81-84 molded dash that was modified to fit the "80" style snap on mount:

Image

Then getting the gauges installed into a nicer Krylon Fusion painted 81-82 style molded dash:

Image

When I first built the sled in the winter of 2010-2011, I used the original vacuum formed ABS dash, and it shattered after a few miles. Last year I adapted a later model dash to the snap on dash hinge. For this year, I updated the sled to the radiator support from the parts 82, and am using the entire dash set up with the bolt together hinge and mounting system. I think this will hold up better in the rough mogals and jumps.
Last edited by JoeRainville on Thu Dec 05, 2013 12:03 pm, edited 4 times in total.
Honorary Tech Editor

Chuck Norris doesn't get frost bite. He bites the frost.
User avatar
JoeRainville
Posts: 4355
Joined: Tue Aug 02, 2005 12:00 am
Real Name: "John Deere Joe"
Location: Fort Worth, Texas
Contact:

Re: Liquifire #621, Part II, Take III

Post by JoeRainville »

Hello Jim,

I will do my best to answer your questions:

1) I did the tunnel in hi gloss black, called "Piano Black" at Longhorn Powder coating.
2 - 3) I had everything else done in "Semi-Gloss Black" that is a bit more shiny than "Blitz Black" should be. When I do my 84 LF, I will go to a less glossy black as I want that to be more original looking.
4) It's not that expensive to power coat, especially if you can bring the parts in already sand blasted. They charged me $25.00 per front bumper, $75.00 for all the small parts shown sitting on the tunnel, and I think it was $400 for the tunnel, bulkhead, radiator and tank supports. Ski's were $125 for 4 of them. I do not know if they can use two colors on the same assembly. Separating the tunnel is a pain, but it's not that bad.
5) I used some Duplicolor spray cans on this sled, and I did use JD Blitz Black cans all over my restored 340/s. I use VHT high temp header paint on the exhaust, but you have to bake it to make it hold up, or you can run the motor to heat the pipe. Avoid the cheap paint, it's worth a few buck to upgrade.
Note that I have only restored a few sleds, but I have rebuilt several of them mechanically.
6) I want my sled to look good, and I want to see how well the powder coating holds up before I do more sleds with it, like the 83 Custom and 84 stock Liquifires I am working on next. After crashing hard last year, I understand the risks. That is one reason why I fixed the old bumper instead of using another one.
7) I used to be and R&D engineer for GM near Rochester, NY, until a layoff in 2009. Found a job that pays about double in Aerospace, but had to move to Fort Worth...and I brought most of my sleds with me.

Good luck with your sled, and I hope this helps!
-Joe Rainville
jimmy245 wrote:Joe:

I am a complete newbie to this restoration game. I look at how you are restoring your sled and it makes me feel like I am using the Caveman technique to restore my 80 Liquifire!! I have the thing totally apart and have been sandblasting indiviual components and then using either Rustoleum "Professional" spray cans from hardware store (a silver can that only comes in gloss or flat black) or Duplicolor engine enamel. I like the Duplicolor since it comes in various shades of black - gloss, semi-gloss, and low gloss. Easier to match to original colors especially components under hood which are not gloss black. I have done the suspension in gloss black with the Rustoleum.

For the tunnel and front end, I plan to have them powder coated (but know very little about powder coating).

You have separated your tunnel from the front end of the body and had each powder coated separately. The tunnel section is a gloss black. However the front end is more of a satin or low gloss black. Here are my questions:

1. What color powder coating did you use for the tunnel section?
2. What color powder coating did you use for the front end?
3. What color powder coating did you use for the bumper?
4. What is the cost of having the above all powder coated?


Since I would rather not separate my tunnel from the front end, I am assuming that whoever I have do the powder coating can do the tunnel section in the glossy color and then the front end in the semi or low gloss and then throw the whole thing in the oven. Does that make sense?

As it looks like you have done quite a few restorations, I would assume you have used spray can paint on some of those restorations.

5. Any spray can paint brands that you think are superior to others that you would recommend? [I know preparation is 80% of the paint job and I am going all out on preping my components prior to painting.]

6. Cannot figure out why you would take that beautiful restoration and take the chance of smashing it up in a race?

7. Why in the world do you live in Texas?????

Best,

Jim - Long Lake, MN
Last edited by JoeRainville on Tue Jan 28, 2014 7:04 pm, edited 2 times in total.
Honorary Tech Editor

Chuck Norris doesn't get frost bite. He bites the frost.
User avatar
JoeRainville
Posts: 4355
Joined: Tue Aug 02, 2005 12:00 am
Real Name: "John Deere Joe"
Location: Fort Worth, Texas
Contact:

Re: Liquifire #621, Part II, Take III

Post by JoeRainville »

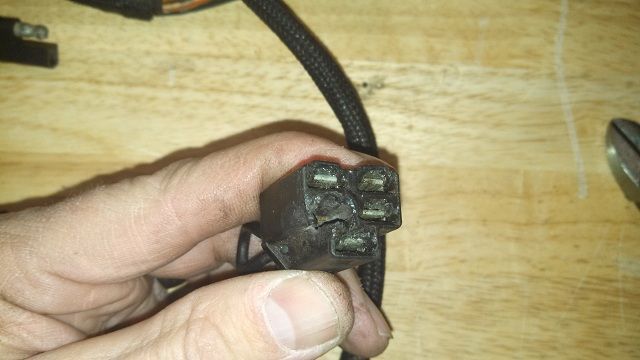
The wiring issues that took out the lights were pretty easy to find on inspection:

Image

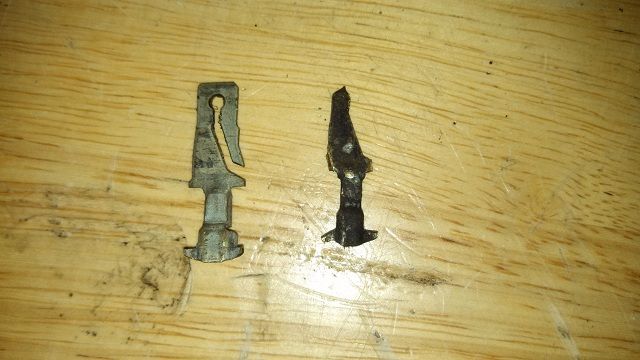
That was the main plug that goes into the motor from the chassis. Below is one of the ground pins on the motor side of the connector:

Image

Luckily I had a few parts harnesses to steal parts from, and repairs were made pretty easily.
Honorary Tech Editor

Chuck Norris doesn't get frost bite. He bites the frost.
User avatar
JoeRainville
Posts: 4355
Joined: Tue Aug 02, 2005 12:00 am
Real Name: "John Deere Joe"
Location: Fort Worth, Texas
Contact:

Re: Liquifire #621, Part II, Take III

Post by JoeRainville »

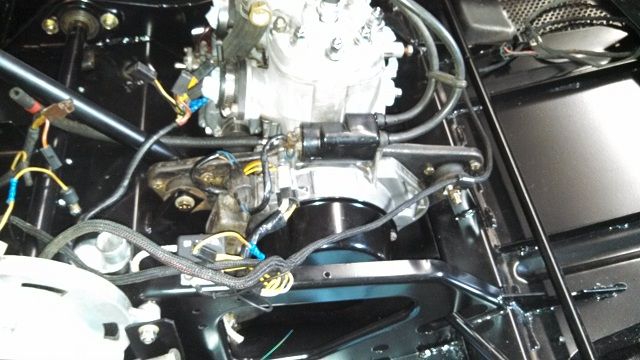
After the damaged wiring was repaired and the melted connectors replaced, the harness was reinstalled into the chassis. The taillight was hooked up, but the dash is not installed yet so I will have to plug in the gauges and switches later.


Image

The above pic shows one the few parts I did not repaint or powder coat: the mag side motor mount plate. It bugs me to have left it, and I will get a couple done so I can change that one out after this season.

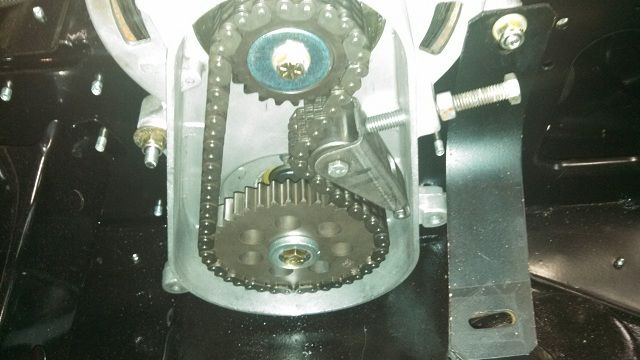
Next up was installing the 21/39 gear set. Some advice here, I used 15 plate wide gears because I never broke one when I raced SnoCross, and I had some spare gears around to play with. I used a 68 pitch "Polaris length" aftermarket chain to go with the 21/39 ratio gears. That is the stock ratio for an 82-84 Liquifire with the TR-800 Clutch and is much deeper than the stock 80-81 Liquifire ratios. But, stock Liquifires use 11 plate wide chain and gears. Turns out the 15 plate chain hit in a few spots. I had to recess the lower gear washer so the bolt did not rub the case cover, and I had to radius the inner cover lip around the top to prevent chain contact. I would recommend going to a 13 plate wide set up to reduce clearance issues while still having a stronger chain than stock:

Image
Last edited by JoeRainville on Mon May 05, 2014 7:22 pm, edited 2 times in total.
Honorary Tech Editor

Chuck Norris doesn't get frost bite. He bites the frost.
Post Reply