tools, techniques, shortcuts, bargains
Re: tools, techniques, shortcuts, bargains
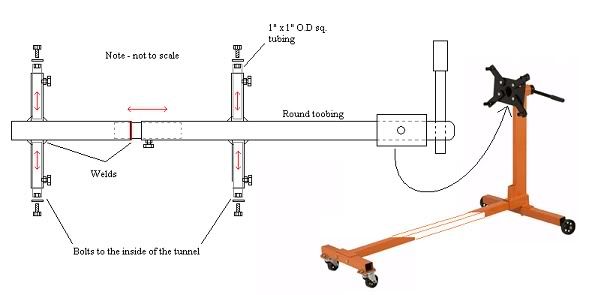
got thinking would there be an easy way to be able to paint a snowmobile tunnel without having to hang it from the ceiling or laying on the ground to pain the front end, also if it would be possible to paint the underneath and top side of the chassis all @ the same time? Here’s what i came up with not sure how practical it is but just idea i came up with that seems like it would work good when i paint a cyclone chassis this summer that has adjustable parts that bolt into the existing holes that the rear suspension goes into on the tunnel, then you could rotate the whole tunnel to paint it
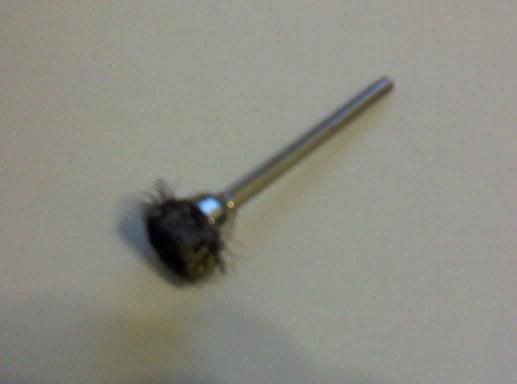
and another tool i found works good with an electric drill is are these little cone shaped wire wheels on cleaning up aluminum chain cases and engine blocks use to use them in auto body class my JR and SR. years of H.S, i have to look around and see where i can buy them(maybe fasten all or harbor freight) i know we use to order them buy the box of 25 or 50 of them
Re: tools, techniques, shortcuts, bargains
the way we did mine was to used a pair of saw horses , we fashioned up some 12 inch wide by abut 12 inches tall lumber off the top of them that went inside the tunnel front and back ,this allowed us to paint all but 2 one inch strips a foot long up inside the tunnel not visible with track installed this allowed for easy painting just our idea thanks wade
certificate recipiant of the 12 vintage challenge !! on a 78 liquifre 440,
certificate recipiant of the 13 vintage challenge !! on a 340/s
certificate recipient of the 14 vintage challenge !! on a 78 liquifire 440
joe forgot the certificates for the 2015 vintage challenge
crossed the start/finish line twice at the 2013 and 2014 I500 on a 78 liquifire 440
certificate recipiant of the 13 vintage challenge !! on a 340/s
certificate recipient of the 14 vintage challenge !! on a 78 liquifire 440
joe forgot the certificates for the 2015 vintage challenge
crossed the start/finish line twice at the 2013 and 2014 I500 on a 78 liquifire 440
Re: tools, techniques, shortcuts, bargains
Variation on the clutch puller here. Had an old JLO with a steel drive clutch, puller is NLA unless you make your own. So, bought a GRADE 8 bolt to fit the threads on the clutch (not the crank). Was 9/16 fine thread IIRC. Tip the motor on its side with the clutch bore facing up. Fill with hydraulic fluid right up to the threads. Wrap the bolt with teflon tape and spin it down in with impact wrench. Pops the clutch off with ease, easier to clean up than grease. I wrapped a rag behind the clutch to catch the fluid as the clutch popped off . Use a grade 8 bolt for this as you don't want to strip out the threads in the clutch, and clean the threads good if they're nasty. Using fluid will never damage the crank or it's threads either. HTH.
Re: tools, techniques, shortcuts, bargains
yep, 428 CJlwb140 wrote:it got an fe in it??
Re: tools, techniques, shortcuts, bargains
Hi guys.
I thought I would share something that I found useful. I recently rebuilt the 440/5 in my 600. All went well until it came time to time the points ignition. I tried to use a multi-meter, but I was not happy with the accuracy. I decided I needed a light like the service manual shows. I bought a cheap Wal-Mart flash light and tore it apart. I soldered a copper wire to each side of the switch and installed alligator clips on the ends. I was then able to clip one on to the crank case and one onto the coil wire. The light dims just as the points open just as it says in the service manual. I also found it much easier to time with the cam removed from the flywheel. Has anyone else made their own light to time these old engines?
DE
Dustin Elder
Salem, OH
Midmounts.... Lots and lots of midmounts...
"Everyone is entitled to be stupid, but some abuse the privilege."
Salem, OH
Midmounts.... Lots and lots of midmounts...
"Everyone is entitled to be stupid, but some abuse the privilege."
Re: tools, techniques, shortcuts, bargains
While at my friends shop the other day, he showed me something on one of his sleds which i thought was a very good idea. Albeit, it's NOT really anything new to someone who may work on cars, trucks, machinery etc, i thought it was a good idea and worth sharing with everyone here.
He was busy checking the drive chain in one of his sleds and showed me a strong magnet he epoxied on the OUTSIDE of the chaincase cover of one of his Artic Cats. Inside, were all the filings collected up on the cover so they were out of suspension/circulation within the chaincase lube.
Good idea, i thought... This is nothing new since magnets are used in a lot of places in the automotive/machinery world to collect filings - it's a simple idea, but somedays we tend to overlook the simple things and "good ideas"..
I.T.T./N.Y.P.M. /
1981 Trailfire 440 (Original Owner)
1980 Liquifire
1981 Sportfire
1983 Sprintfire
1982 Snowfire
1978 CC Liquifire
1979 340 Trailfire
1982 Trailfire Special
1980 Liquifire
1981 Sportfire
1983 Sprintfire
1982 Snowfire
1978 CC Liquifire
1979 340 Trailfire
1982 Trailfire Special
-
- Posts: 89
- Joined: Tue Feb 01, 2011 4:14 pm
- Location: 43231
Re: tools, techniques, shortcuts, bargains
[quote="liquidatorkid89"]got thinking would there be an easy way to be able to paint a snowmobile tunnel without having to hang it from the ceiling or laying on the ground to pain the front end, also if it would be possible to paint the underneath and top side of the chassis all @ the same time? Here’s what i came up with not sure how practical it is but just idea i came up with that seems like it would work good when i paint a cyclone chassis this summer that has adjustable parts that bolt into the existing holes that the rear suspension goes into on the tunnel, then you could rotate the whole tunnel to paint it
It's been awhile since you posted this, but did you ever try it out?
- liquidatorkid
- Posts: 258
- Joined: Mon Jul 05, 2010 9:22 pm
- Location: Canisteo NY
Re: tools, techniques, shortcuts, bargains
never did try it out, still have to paint the tunnel, hopfully this summer
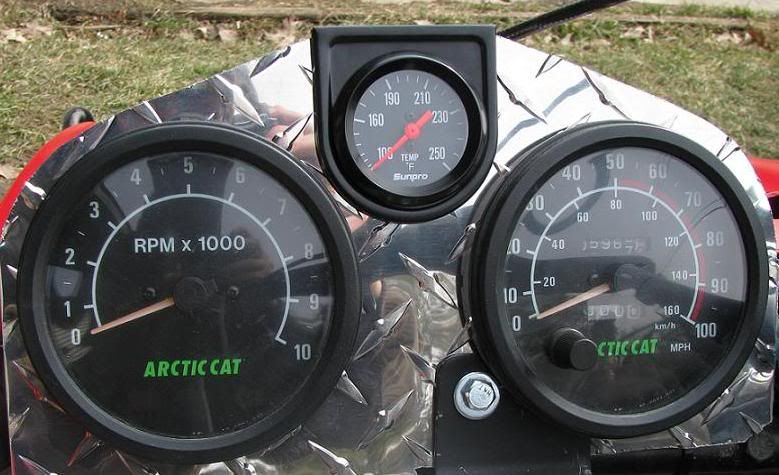
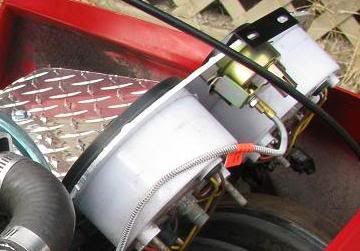
i came across something the other day i thought that you guys that looking for temp gauges may be interested in that have broken temp gauges on your lf's, dators etc... or if you want one just for a rider. i went to the local advance auto parts store looking for a small black faced universal temp gauge that i could use on my chaparral and i did come across one that will work on just about any sled you can think of, it comes with all mounting hardware, a bracket, 72" capillary tube, different size adapters to be able to thread it into various size heads and its under $18 and surprisingly its pretty nice quality, i got it hooked up to the sled and thought that i would share the info because id does look like it will slip right in the dash panel
i know that it doesn't have the original deer logo, but if you are looking for one for a rider or one to replace that broken one i think its a good investment, i would imagine that you may be able to replace the back ground out to the deer logo, but i would imagine that they are calibrated differently?
anyways here is the temp gauge that i picked up
http://shop.advanceautoparts.com/webapp ... %7CGRP2032_____
Re: tools, techniques, shortcuts, bargains
Guys,
Bargain temp gauge that has the right dip tube length. Forget the gauge, There is no way to mount the gauge in the dash.
Kenny Waters(boy)
Rochester, NY
Mechanic for founding VDR teammate JDJR
Opinions are worthless...Education is priceless
Aspiring to be the Charlie Daniels of the torque wrench
'74 X-6
'75 X-8
'75 340S
'77 340 Liquifire
'78 440 Liquifire
'80 Spitfire
'80 Liquifire (completed VC and sometimes raced)
'81 Liquifire (bib #212f Red Lake Vintage CC Sled)
'82 Liquifire
'83 Liquifire
'83 Sprintfire (1 runner +2 parts sleds)
'96 Indy Storm (hated by JDJR and Thundercats)
- nick80lf
- Posts: 1161
- Joined: Thu Jan 14, 2010 10:45 pm
- Real Name: Nick
- Location: The snow free zone of Ohio
Re: tools, techniques, shortcuts, bargains
Here is a good technique when working with seat foam.
When I recently installed a new seat cover I discovered that the foam didn't fill the "hump" area of the new seat cover. This was not a defect in the new seat cover. It was caused by the foam being compressed for several years. After a little digging I discovered this video on youtube, that demonstrates using steam to take the wrinkles out of the foam.
http://www.youtube.com/watch?v=KbPHsdwVMY4
I was skeptical, but this does a very good job. The foam also seems to be little softer now. I used a shark steam cleaner, but I think any clothes steamer would also work. Here are a few pictures:
This area wasn't too bad. I was almost finished steaming the seat and thought I should take a picture to share.
2012-06-02 12.54.18 by nick80lf, on Flickr
This is a picture of the same area after finishing the steam treatment. Once the seat cooled the foam did feel a little damp. I took it outside and set it in the sun for about 20 minutes to let it dry out before installing the cover.
2012-06-02 13.10.38 by nick80lf, on Flickr
80 Liquifire (purchased 1996 ~ Running)
80 Liquifire (purchased 2010 ~ Running....Now)
80 Liquifire (purchased 2011 ~ Not running - I officially have a problem now)
83 Snowfire (purchased 2014 father/son restoration project)
78 Spitfire ~ sold (should have been shot for this)
80 Liquifire (purchased 2010 ~ Running....Now)
80 Liquifire (purchased 2011 ~ Not running - I officially have a problem now)
83 Snowfire (purchased 2014 father/son restoration project)
78 Spitfire ~ sold (should have been shot for this)
Re: tools, techniques, shortcuts, bargains
I made up a jig to drill out rivets and put new rivets into idler wheels (circa 76 Cyclone skid, not sure what other skids used these wheels). I tried it for drilling old rivets out and it worked fantastic, I do not have new rivets yet, but I think it will work just as slick for installing them.
Adam Epp
Winnipeg, MB, Canada
74 400 (2 - sold)
75 800 (motor in pieces, next on the resto list)
75 X4 Special (bare tunnel, stripped)
76 340 Cyclone (resto in progress)
76 340 Cyclone (bare tunnel, stripped)
Winnipeg, MB, Canada
74 400 (2 - sold)
75 800 (motor in pieces, next on the resto list)
75 X4 Special (bare tunnel, stripped)
76 340 Cyclone (resto in progress)
76 340 Cyclone (bare tunnel, stripped)
Re: tools, techniques, shortcuts, bargains
Here we go...
The results
Adam Epp
Winnipeg, MB, Canada
74 400 (2 - sold)
75 800 (motor in pieces, next on the resto list)
75 X4 Special (bare tunnel, stripped)
76 340 Cyclone (resto in progress)
76 340 Cyclone (bare tunnel, stripped)
Winnipeg, MB, Canada
74 400 (2 - sold)
75 800 (motor in pieces, next on the resto list)
75 X4 Special (bare tunnel, stripped)
76 340 Cyclone (resto in progress)
76 340 Cyclone (bare tunnel, stripped)
Re: tools, techniques, shortcuts, bargains
Some dial indicator holders made from old spark plugs. (btw the ceramic is difficult to break out of the spark plug body )
Adam Epp
Winnipeg, MB, Canada
74 400 (2 - sold)
75 800 (motor in pieces, next on the resto list)
75 X4 Special (bare tunnel, stripped)
76 340 Cyclone (resto in progress)
76 340 Cyclone (bare tunnel, stripped)
Winnipeg, MB, Canada
74 400 (2 - sold)
75 800 (motor in pieces, next on the resto list)
75 X4 Special (bare tunnel, stripped)
76 340 Cyclone (resto in progress)
76 340 Cyclone (bare tunnel, stripped)
-
- Posts: 1035
- Joined: Thu Mar 08, 2007 1:00 am
- Location: Roblin, MB
Re: tools, techniques, shortcuts, bargains
Since I'm the guy that started this thread, I figured it's about time I contributed another tip to it. My latest discovery came quite by accident. After trying a heat gun and several different products to remove some decal residue from a snowmobile tunnel in the sweltering heat one evening and being eaten up my mosquitos the entire time. I sprayed myself down with some Deep Woods Off so that I could continue my struggle. While doing so, some of the stuff oversprayed onto the decal residue. It's incredible how well it worked at removing the gunk that was still left on the tunnel. It wiped right off instantly. I've since tried it on a few other things and it has worked better than any other residue remover I ever tried and now it is my Go To product anytime I have to deal with any decal or tape remains. I have not yet tried it on a sled hood so I can't yet say how it'll work on fibreglass or plastic.....I'm sure it will do the job, just not sure if it might eat into the finish. By the way, I also tried regular Off and it does not work very well. It needs to be the Deep Woods stuff in the green can.
Peter from Roblin, Manitoba
Re: tools, techniques, shortcuts, bargains
Kinda says something about what you're spraying on your skin doesn't it? lolLiquifire 4/6 wrote: It's incredible how well it worked at removing the gunk that was still left on the tunnel. It wiped right off instantly. I've since tried it on a few other things and it has worked better than any other residue remover I ever tried and now it is my Go To product anytime I have to deal with any decal or tape remains.
DE
Dustin Elder
Salem, OH
Midmounts.... Lots and lots of midmounts...
"Everyone is entitled to be stupid, but some abuse the privilege."
Salem, OH
Midmounts.... Lots and lots of midmounts...
"Everyone is entitled to be stupid, but some abuse the privilege."