Liquifire #621, Part II, Take III
-
ljm
- Posts: 705
- Joined: Tue Jan 26, 2010 10:05 am
- Real Name: Lloyd
- Location: near Port Elgin, Ontario
Re: Liquifire #621, Part II, Take III
Thanks for posting so much detail about this.
It is great info.
Lloyd
It is great info.
Lloyd
Several Deere's
Several Kawasaki's
ACSCC #1534
Several Kawasaki's
ACSCC #1534
- JoeRainville
- Posts: 4362
- Joined: Tue Aug 02, 2005 12:00 am
- Real Name: "John Deere Joe"
- Location: Fort Worth, Texas
- Contact:
Re: Liquifire #621, Part II, Take III
After the chain case was closed up, I moved on to the fuel and exhaust systems. The manifold and pipe from the 82 parts sled had been painted with VHT high temp head paint and set a side a while ago, so that was a straight up bolt in job:
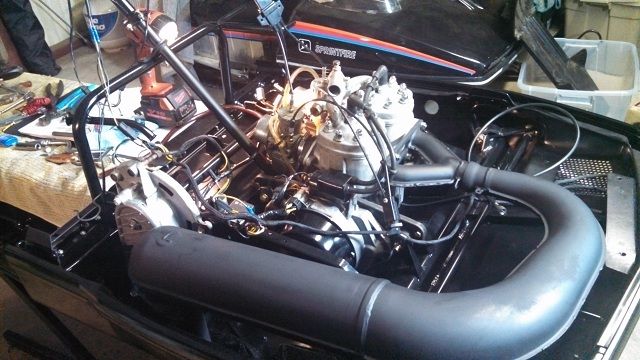
I took the carbs apart and gave them a quick once over. Last year everything was new in them, and they were drained of fuel after the Challenge, so they stayed pretty clean. I then reinstalled the Cat 440 Sno Pro fuel pump and carbs:
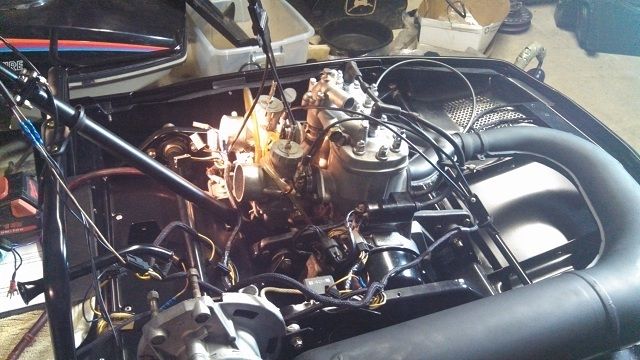
I still need to work on the custom throttle cable Watersboy helped me with. We are using a combination of Kawi/Deere/Cat Kimpex cables, and he made a billit cable union for the snap apart junction. I mated a Kawi Invader Kimpex bottom end to either a Deere or Cat top cable, but it's not right. Kenny tells me to try a Deere Kimpex bottom half on a Kawi or Cat top end...or something like that...
Next up were the clutches...

I took the carbs apart and gave them a quick once over. Last year everything was new in them, and they were drained of fuel after the Challenge, so they stayed pretty clean. I then reinstalled the Cat 440 Sno Pro fuel pump and carbs:

I still need to work on the custom throttle cable Watersboy helped me with. We are using a combination of Kawi/Deere/Cat Kimpex cables, and he made a billit cable union for the snap apart junction. I mated a Kawi Invader Kimpex bottom end to either a Deere or Cat top cable, but it's not right. Kenny tells me to try a Deere Kimpex bottom half on a Kawi or Cat top end...or something like that...
Next up were the clutches...
Last edited by JoeRainville on Tue Jan 28, 2014 7:08 pm, edited 1 time in total.
Honorary Tech Editor
Chuck Norris doesn't get frost bite. He bites the frost.
Chuck Norris doesn't get frost bite. He bites the frost.
- JoeRainville
- Posts: 4362
- Joined: Tue Aug 02, 2005 12:00 am
- Real Name: "John Deere Joe"
- Location: Fort Worth, Texas
- Contact:
Re: Liquifire #621, Part II, Take III
Hello Lloyd,ljm wrote:Thanks for posting so much detail about this.
It is great info.
Lloyd
I hope you guys find this information usefull for either restorations, rebuilds or race sled set ups. I have been candidly sharing what works along with what didn't so you don't make the same mistakes I did the first time I put this girl together.
Thanks,
-Joe
Honorary Tech Editor
Chuck Norris doesn't get frost bite. He bites the frost.
Chuck Norris doesn't get frost bite. He bites the frost.
-
jimmy245
- Posts: 28
- Joined: Sat May 08, 2010 12:04 pm
- Real Name: Jim Erlandson
- Location: Minneapolis Area
Re: Liquifire #621, Part II, Take III
Joe:
Really appreciate the painting advice.
Thanks again,
Jim
Really appreciate the painting advice.
Thanks again,
Jim
Bought brand new '80 Liquifire in '79. Sold when I moved to Alaska in '81.
Now restoring '80 Liquifire from bottom up.
Now restoring '80 Liquifire from bottom up.
- JoeRainville
- Posts: 4362
- Joined: Tue Aug 02, 2005 12:00 am
- Real Name: "John Deere Joe"
- Location: Fort Worth, Texas
- Contact:
Re: Liquifire #621, Part II, Take III
I bolted in the radiator to the 1982 mount I had powder coated, and then installed it into the chassis. Since the powder coat is pretty thick, I did have to sand down the left side tube where it slips into the chassis mount:
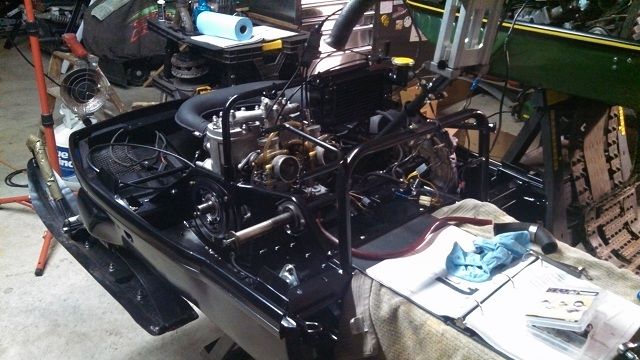
This view also shows the late model Cat fuel pump down by the carbs. The original Deere pumps give me fits, and these Cat units hold up well, and don't allow fuel to flood the engine while sitting or being trailered. The tank on my 05 Cat 440 is high up on the chassis, while the motor sits very low. If this pump works there, this little Liquifire shouldn't be a problem.

This view also shows the late model Cat fuel pump down by the carbs. The original Deere pumps give me fits, and these Cat units hold up well, and don't allow fuel to flood the engine while sitting or being trailered. The tank on my 05 Cat 440 is high up on the chassis, while the motor sits very low. If this pump works there, this little Liquifire shouldn't be a problem.
Last edited by JoeRainville on Thu Dec 05, 2013 5:57 pm, edited 1 time in total.
Honorary Tech Editor
Chuck Norris doesn't get frost bite. He bites the frost.
Chuck Norris doesn't get frost bite. He bites the frost.
- JoeRainville
- Posts: 4362
- Joined: Tue Aug 02, 2005 12:00 am
- Real Name: "John Deere Joe"
- Location: Fort Worth, Texas
- Contact:
Re: Liquifire #621, Part II, Take III
While the clutching on this sled was updated to Cat ZR parts, the calibration was lacking. I am taking the time this year to dial it in and improve the top end of the sled. First up was servicing the driven, and selecting a better driven helix:
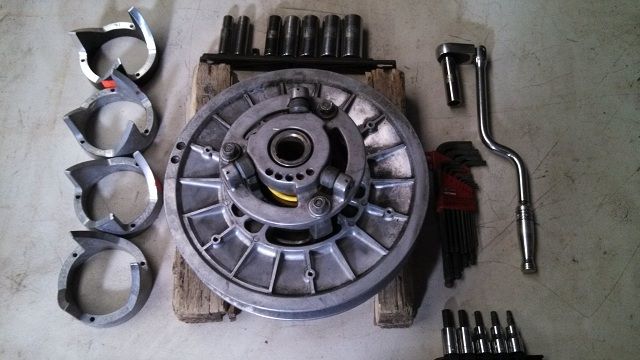
Like a Deere clutch, the three cover bolts are all that holds it together:
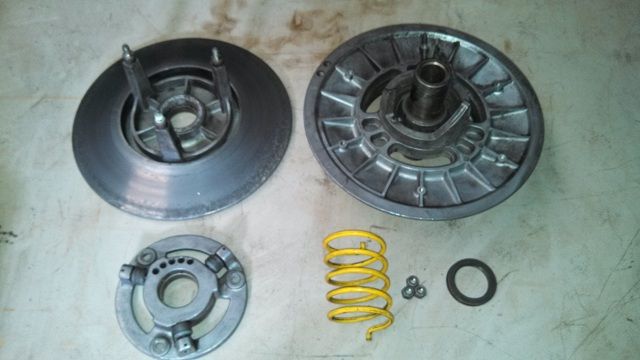
I had a 51 degree helix in stalled, but I am going to try a straight up 48 degree unit first, but I have several other compound units to try, courtesy of my buddy Tom Rowland at Thomas SnoSports in Ogalvie, MN. Luckily for me, he had several on the shelf for me to try.

Like a Deere clutch, the three cover bolts are all that holds it together:

I had a 51 degree helix in stalled, but I am going to try a straight up 48 degree unit first, but I have several other compound units to try, courtesy of my buddy Tom Rowland at Thomas SnoSports in Ogalvie, MN. Luckily for me, he had several on the shelf for me to try.
Honorary Tech Editor
Chuck Norris doesn't get frost bite. He bites the frost.
Chuck Norris doesn't get frost bite. He bites the frost.
- JoeRainville
- Posts: 4362
- Joined: Tue Aug 02, 2005 12:00 am
- Real Name: "John Deere Joe"
- Location: Fort Worth, Texas
- Contact:
Re: Liquifire #621, Part II, Take III
With Aluminum clutch sheaves, you need to sand them occationally to remove belt crud and any surface corrosion:
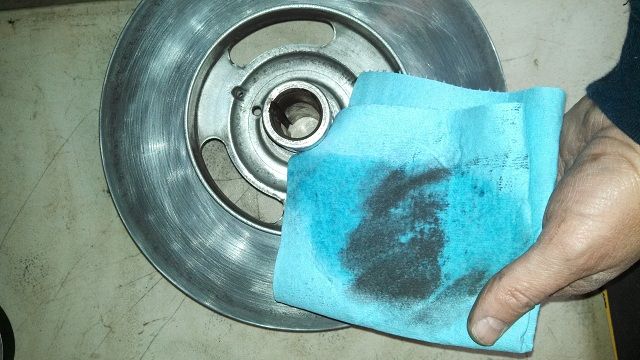
Wiping them down with brake parts cleaner show the belt gunk that was embedded into the sheave. Racers sand there clutches quite often. I did at at least twice per weekend in SnoCross.
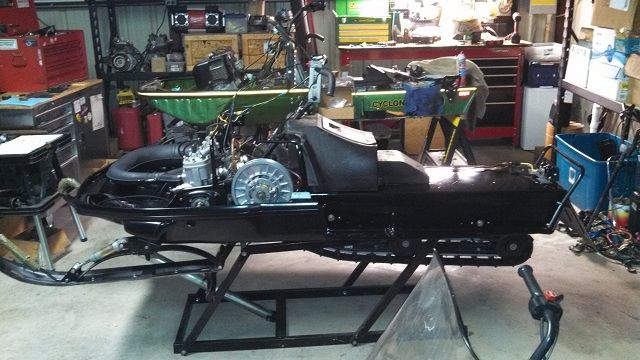
After re-assembly, the secondary was installed into the jackshaft. This is a full 1" jackshaft that I literally found on the floor of my old shop in NY. It had the same sprocket interface as the Deere shaft, and it bolted right it. Funny, but I really have no idea what it came from, other than maybe some misc Cat. Waters found a simular one at a junk yard for his sled too.
Next up: while it was in the 70's this week in Fort Worth, I tried my hand installing tunnel stickers...

Wiping them down with brake parts cleaner show the belt gunk that was embedded into the sheave. Racers sand there clutches quite often. I did at at least twice per weekend in SnoCross.
After re-assembly, the secondary was installed into the jackshaft. This is a full 1" jackshaft that I literally found on the floor of my old shop in NY. It had the same sprocket interface as the Deere shaft, and it bolted right it. Funny, but I really have no idea what it came from, other than maybe some misc Cat. Waters found a simular one at a junk yard for his sled too.

Next up: while it was in the 70's this week in Fort Worth, I tried my hand installing tunnel stickers...
Honorary Tech Editor
Chuck Norris doesn't get frost bite. He bites the frost.
Chuck Norris doesn't get frost bite. He bites the frost.
- JoeRainville
- Posts: 4362
- Joined: Tue Aug 02, 2005 12:00 am
- Real Name: "John Deere Joe"
- Location: Fort Worth, Texas
- Contact:
Re: Liquifire #621, Part II, Take III
While it was still warm in the first half of week down here, I went ahead and gave installing the tunnel stripes a shot. This is my first time installing full length tunnel decals, so I am not saying this is the best or only way to do it. It's just they way I did it, and no doubt there are folks who are better and far more experienced than I am. This decal kit was ordered last year from Engineering Graphics.
That said, I stared out by taking some measurement off my 81 Liquifire and using painters masking tape to mark the bottom edge of the stripe. I also took the fuel tank back off, as I did not rivet it in place yet as these stripes fold over the top of the tunnel, under the tank:
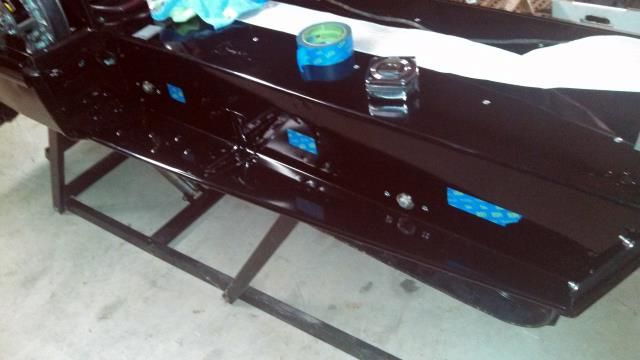
I then used windex to spray the tunnel so the decal can be adjusted slightly, then I used a credit card to squeegee the air bubbles out:
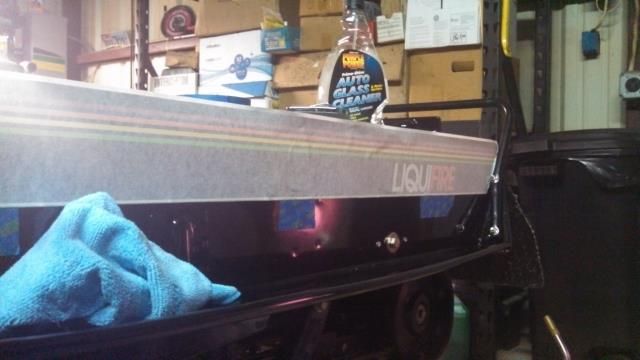
That said, I stared out by taking some measurement off my 81 Liquifire and using painters masking tape to mark the bottom edge of the stripe. I also took the fuel tank back off, as I did not rivet it in place yet as these stripes fold over the top of the tunnel, under the tank:

I then used windex to spray the tunnel so the decal can be adjusted slightly, then I used a credit card to squeegee the air bubbles out:

Honorary Tech Editor
Chuck Norris doesn't get frost bite. He bites the frost.
Chuck Norris doesn't get frost bite. He bites the frost.
- JoeRainville
- Posts: 4362
- Joined: Tue Aug 02, 2005 12:00 am
- Real Name: "John Deere Joe"
- Location: Fort Worth, Texas
- Contact:
Re: Liquifire #621, Part II, Take III
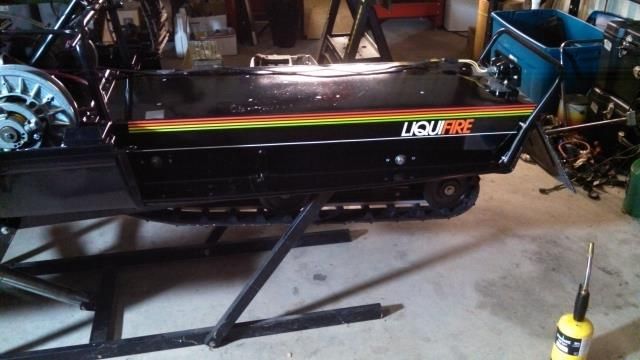
I then let the decals on both sides of the tunnel dry for a full day before I pulled off the protective covering. I was happy with the results for my first attempt:
Next up: Installing the dash and playing a game called "sort the wiring"
PS: This weekend's progress was slower than expected due to an ice storm in Fort Worth. I was actually out snowmobiling for the past 3 days...

Next up: Installing the dash and playing a game called "sort the wiring"
PS: This weekend's progress was slower than expected due to an ice storm in Fort Worth. I was actually out snowmobiling for the past 3 days...
Honorary Tech Editor
Chuck Norris doesn't get frost bite. He bites the frost.
Chuck Norris doesn't get frost bite. He bites the frost.
- 69camaro
- Posts: 1427
- Joined: Sat Oct 22, 2005 12:00 am
- Real Name: Duane Gjerseth
- Location: Augusta, Wisconsin (Eau Claire area)
Re: Liquifire #621, Part II, Take III
Sure looks nice Joe. I supplied Frank with NOS decals for him to make the 80-81 decals. I also took him my 76 and 78 Liquifires so he could re-pop them also. I'm sure glad I did before he moved.

75-340/s
76-340 Liquifire
77-440 Liquifire Custom
78-440 Liquifire
84-Liquifire
84-Sportfire
84-Sprintfire
84-Snowfire
78-Polaris TXL
82-Indy 500
91-XC 400
91-Indy 500 Special
94-Indy 440 Special
95-XCR 440 Special
96-XCR 440 Special
99-XC 600
04-XC 700
81-Kawasaki 440 Invader
76-340 Liquifire
77-440 Liquifire Custom
78-440 Liquifire
84-Liquifire
84-Sportfire
84-Sprintfire
84-Snowfire
78-Polaris TXL
82-Indy 500
91-XC 400
91-Indy 500 Special
94-Indy 440 Special
95-XCR 440 Special
96-XCR 440 Special
99-XC 600
04-XC 700
81-Kawasaki 440 Invader
-
ICCSF 108
- Posts: 4369
- Joined: Sun Jul 17, 2005 12:00 am
- Real Name: Kenny Heins, AKA Grumpy
- Location: Blue Springs Mo.
- Contact:
Re: Liquifire #621, Part II, Take III
Look'n good Joe, BUT HOW MANY DAYS LEFT?  But if need be your welcome to stop by Chris's to get some help on last minute stuff, as long as we ( probably just you & me ) only have to burn the midnight oil one or 2 nights??

Grumpy
Grumpy
AKA: Kenny, Grumpy, Mr. Richard Head
"I Hunt For it, Purchase it, Haul it, Sometimes Repair it, Sometimes Break it, Then Fix it Again, Label it, Warehouse it, Talk About it, So NOW, HOW Can I Take Any Less $$ For It?"
"God I love the smell of KLOTZ in the morning, That smell, you know that Gasoline/Oil Smell, MAKES the whole place SMELL like.. LIKE VICTORY. You know someday the 2 strokers are gonna end..."
Do Anti-War Protesters have reunions? If so what do they TALK about?
- JoeRainville
- Posts: 4362
- Joined: Tue Aug 02, 2005 12:00 am
- Real Name: "John Deere Joe"
- Location: Fort Worth, Texas
- Contact:
Re: Liquifire #621, Part II, Take III
Duane,
Thanks for helping out with getting Frank to repop these decals, the set is very complete and they look sharp.
Grumpy,
I have 2 months left to go before the race. I should have it running to bring to NY over Christmas if they have snow. And I am way ahead of where I normally am this time of year. Remember when Watersboy and I first built our sleds, I started from a bare bulkhead on Dec 16th to race on Jan 20th? I am spending a few hours a night in the shop to get this thing ready.
Thanks for the input guys,
-Joe
Honorary Tech Editor
Chuck Norris doesn't get frost bite. He bites the frost.
Chuck Norris doesn't get frost bite. He bites the frost.
- JoeRainville
- Posts: 4362
- Joined: Tue Aug 02, 2005 12:00 am
- Real Name: "John Deere Joe"
- Location: Fort Worth, Texas
- Contact:
Re: Liquifire #621, Part II, Take III
I picked up some #10 sized SS hardware and mounted up the dash:
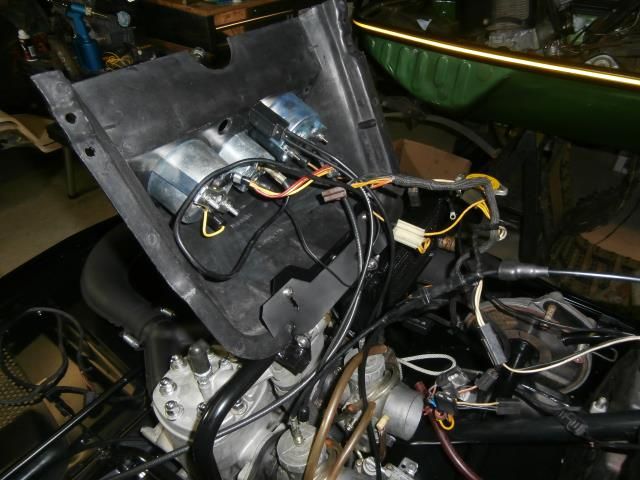
Most of the under dash wiring was hooked back up, along with the speedo cable and such. Then the tank was put back in place so the dash could be aligned to it. I am still thinking about putting some sort of strap or hold down over it to keep it in place, similar to the bungy cord Grumpy put across the fuel tank to keep the door shut...
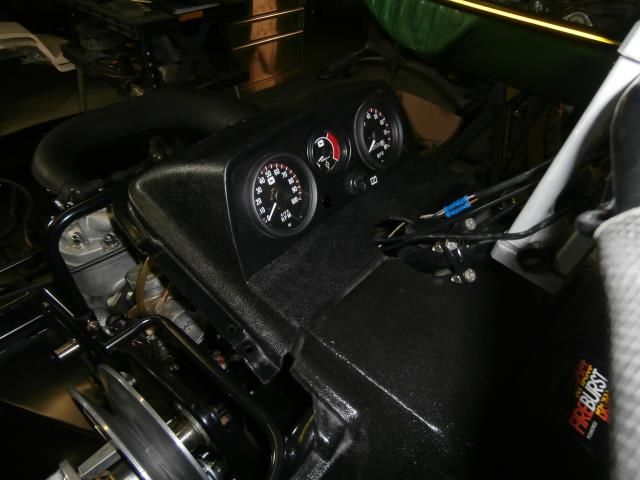

Most of the under dash wiring was hooked back up, along with the speedo cable and such. Then the tank was put back in place so the dash could be aligned to it. I am still thinking about putting some sort of strap or hold down over it to keep it in place, similar to the bungy cord Grumpy put across the fuel tank to keep the door shut...

Last edited by JoeRainville on Mon May 05, 2014 7:29 pm, edited 2 times in total.
Honorary Tech Editor
Chuck Norris doesn't get frost bite. He bites the frost.
Chuck Norris doesn't get frost bite. He bites the frost.
- JoeRainville
- Posts: 4362
- Joined: Tue Aug 02, 2005 12:00 am
- Real Name: "John Deere Joe"
- Location: Fort Worth, Texas
- Contact:
Re: Liquifire #621, Part II, Take III
As of now, she is starting to look like a sled again. I have the drive clutch torn down for service and re-calibration, and I have some work to do on the hydraulic brakes and need to re-staple the seat, fix the throttle cable and a few other small items. I am not sure if there is time to paint the new hood either, but the old hood survived the tree ok, only the hinge was bent up.
9 weeks to...go...
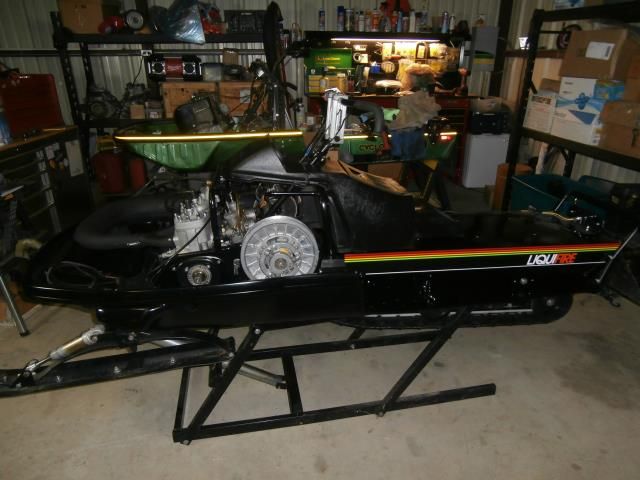
9 weeks to...go...

Last edited by JoeRainville on Mon Dec 09, 2013 7:14 pm, edited 1 time in total.
Honorary Tech Editor
Chuck Norris doesn't get frost bite. He bites the frost.
Chuck Norris doesn't get frost bite. He bites the frost.
Re: Liquifire #621, Part II, Take III
Do you want a 1982 gas tank with a latching door?
Many new and used parts available, I ship anywhere. Thanks everyone.